Chef's notes:
Lamb shanks are among the chewier pieces of meat. Like brisket, flank, shoulder, and other tough cuts of meat, shanks react best to long periods of moist heat. Basically, the sort of heat that is created in a large covered pot, i.e., the braising pan.
Braising is perfect for these tougher cuts of meat because of what happens to the meat as it braises. Tougher cuts of meat like shanks are tough because they have a lot more connective tissue. This connective tissue is dry and chewy. As it cooks, though, it is slowly converted from collagen to gelatin, the compound that makes homemade stock and, hopefully, this braising liquid velvety, thick, rich, and delicious. So, as the meat cooks, the fibrous connective tissue becomes tender, and even though the actual meat is dried out from over cooking, it is offset by this new-found delicate tenderness.
Ingredients
- 2 lamb shanks
- 1 large onion
- 4 carrots
- 8 cloves garlic
- 2 cups red wine
- 3 cups beef stock
- 2 Tbsp tomato paste
- 1 Tbsp Herbes de Provence
- 3 bay leaves
- Sea salt
- Black pepper
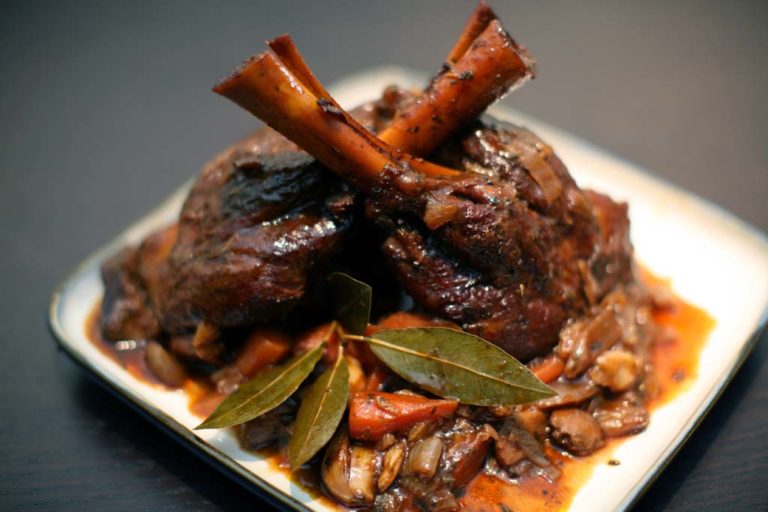
Lamb Shank Recipe: Braised in Red Wine, Beef Stock Provencal Herbs, Carrots, Onion, Garlic, and Tomato Paste
- Prep the lamb shanks and other ingredients. The lamb shank has a bit of papery white covering called “fell.” This must be removed. But leave the silverskin, which is the shiny covering attached to the meat. This will cook away. Liberally salt and pepper the shanks. Next, peel and chop the onion and carrots into thick chunks. Then smash the garlic, peel it, and put it in a bowl with the carrots and onions. Measure out the wine, broth, and tomato paste, mix it together, and put it into another bowl.
- Brown the lamb shanks in the braising pan. It will be best to use a braising pan or other cast iron pan for this recipes. A dutch oven will work just fine as would any cast iron roasting pan. Cast iron holds onto heat and distributes it evenly inside. The pan becomes the oven in a sense. Heat up the braising pan, dutch oven, or roasting pan on medium-high heat with some vegetable oil in it. Add the shanks after a few minutes of preheating. Note that a thinner pan will not require preheating.
- A nice, dark, evenly browned lamb shank is best. The darker, the better. Think about what it would take to burn the lamb shank and then back it off a little. Notice as you brown the shanks that the bottom of the pan is getting dark and covered with browned bits of meat. This is the fond. This is what you are deglazing in step five. Once the shanks are a dark brown color, remove them to a plate and continue onto the next step.
- Put the vegetables, herbs, and garlic into the pan. Remove all but one tablespoon of the oil from the pan. Too much oil at this stage will result in an oily sauce. Fry the vegetables for a minute with the Herbes de Provence and the bay leaves. This will create more fond for the sauce, and it will smell really good, especially when you catch a whiff of the lavender. Make sure to use a non-metal spatula, made of either wood or high-temp plastic.
- Add the wine, beef stock, and tomato paste to the pan. After frying the vegetables for a few minutes, add the liquid to the pan and scrape at the bottom of the pan to remove the fond from it. Make sure to use either a wooden spatula or a plastic one when doing this, as a metal one may damage the enamel. Scrape at it for a few minutes and get the fond mixed into the liquid. Meanwhile, preheat the oven to 375º F. Also, move the racks in the oven to the bottom two spots.
- Put the shanks back in the braising pan. Once the the sauce is hot and nearly at a boil, turn off the heat and put the shanks back in the pan. Don’t worry if the shanks aren’t totally covered, as you will be flipping them a couple times. Also, the design of a braising pan helps to cook even the exposed portion of meat with moisture. The lid fits on very tightly and much steam is produced while in the oven.
- Put the covered braising pan into the oven. Try to make sure the oven is at the right temperature by double checking with an internal oven thermometer. Very often oven thermostats are inaccurate, either because of wear and tear or just shoddy craftsmanship. See my thermometer just below and to the left of the braising pan. Turns out my oven is about 25º cool at this temperature. So I turned it up to 400º F to adjust. But after an hour of braising, it was right on, so I turned it back down to 375º.
- After 45 minutes, take the braising pan out of the oven and check on the meat. Use your spring-loaded tongs to flip the shanks over. Take this time to make sure the oven is still at the right temperature. As I mentioned in the previous step, mine was finally up to 400º F after an hour—15 minutes of preheating and 45 minutes of braising. So I turned it down to 375º F when I put the lamb shanks back in the oven, and I then set the timer for another 45 minutes.
- After 1½ hours of braising, the shanks should be pretty tender. At this stage you will want to reduce some of the liquid in the braising pan to make a killer sauce for the lamb shanks. Take the lid off the braising pan, and stick the lamb shanks in the oven, uncovered, for 20 minutes. This will help to cook off some of the water, making the sauce more concentrated and delicious. After 20 minutes, flip the shanks one last time, and put them back in the oven for another 20 minutes, uncovered.
- Remove the lamb shanks from the oven and let them rest. Remove them from the liquid to a plate and let them rest there for 10 minutes. Drape a little aluminum foil over the shanks to keep them warm. Turn your attention to the sauce. Try to skim off any extra oil floating on top. Next, use a slotted spoon to remove the vegetables to a serving plate or bowl. Taste the remaining liquid. Adjust the seasoning, if necessary. Reduce it if you want, but, for the love of Pete, don’t throw it out! Serve it!
Tips & Tricks
- Remove as much fat as possible in the beginning in order to keep the sauce from being oily.
- The silverskin will be reduced to its basic components and converted to gelatin, which will thicken the sauce, so don’t worry about removing it.
- Do however remove the “fell,” which is the thin papery covering around the whole shank.
- The wine should be from a bottle that you would yourself enjoy. Do this for many reasons but also because you only need 2 cups for the recipe and that leaves over a cup of wine left for you to drink.
- Now you don’t need a braising pan to braise. You can braise in any covered vessel. It’s just that a braising pan is the best at it, hence its name. If you don’t have a braising pan, use any thick heavy pot with a lid that will fit in the oven. Or just go and buy one. You don’t have to spend a fortune, though you could if you wanted. Le Creuset springs to mind. But there are alternatives. Some very reasonable ones.
